The following image shows the Layout Settings page.
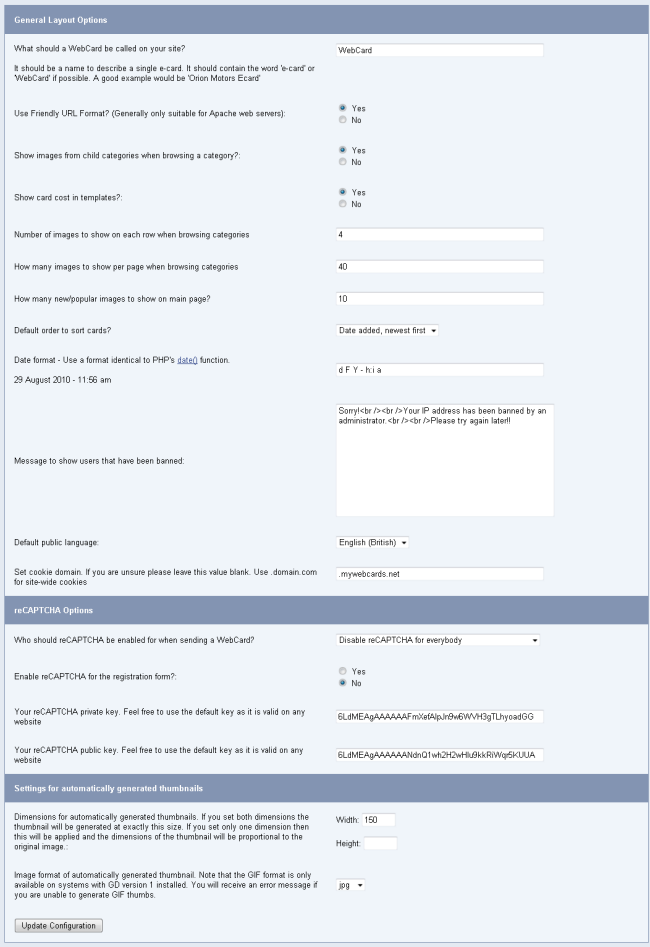
Layout Settings
What Should a WebCard be Called on your Site?
You can choose to rename the cards that your visitors send here. There default is “WebCard”.
Use Friendly URL Format?
WebCards supports search engine friendly URL formats. The default URLs look like this:
When you enable friendly URLs, they will look like this:
Show Images From Child Categories When Browsing a Category?
This option lets you choose whether or not to include images that are from a category that is a child of the current category. Say, for example, you have a category called “Holidays.” This has 2 child categories, “Christmas” and “Easter.” If you put this setting to yes, images from the “Christmas” and “Easter” categories will be shown when browsing the “Holidays” category.
Show Card Cost in Templates?
Choose whether or not to show the cost (in credits) of sending a particular card. This is present in various places in the different template files.
Number Of Images To Show On Each Row When Composing Card
This layout option controls how many images are displayed on each row when you are browsing categories. The best setting for this depends on the size of your image thumbnails. The smaller the thumbnail, the more images will fit on each row.
How Many Images to Show Per Page when Browsing Categories
This option sets how many images are displayed on each page when browsing categories
How Many New/popular Images To Show On Main Page
The main choose image page shows the newest images added to the database and the most popular images (based on the number of cards containing this image sent). You can set how many are shown here. Purely for layout purposes it is best to use the same value as for the setting above.
Default Order To Sort Cards?
When the user is browsing categories do you want the images sorted by order added or alphabetically?
Date Format
This is how the date will show to the user who picks up the card. You should use a format identical to that used by the PHP date() function. You can see an up-to-date list of all the variables allowed at. If you are not sure what to set this to, leave it as it is. When you update this setting you will see an example below.
Message To Show Users That Have Been Banned
Any user that has had their IP address banned will receive this message and nothing else. You should make the message quite descriptive and possibly give the user an email address so they can contact you if they think there has been a mistake.
Default Public Language
Choose which language your visitors will see by default. They will later be able to pick from any other languages you have installed if you allow them.
Dimensions For Automatically Generated Thumbnails
You can enter a width and height. If you enter just a height the image will be this height and the width will be proportional to the original width. The same is true if you only enter a width. If you enter both a height and a width the image will be forced to be this size but will probably be out of proportion.
Set Cookie Domain
In order to make your WebCard cookies available to other sections of your website, you can change the domain the cookies are set to here. To create site-wide cookies use the format .domain.com.
Enable reCAPTCHA?
ReCAPTCHA helps to prevent bots registering and sending WebCards. You can either force non-logged in users to solve a reCAPTCHA when sending a card, set it so that everybody has to solve one, or totally disable it.
Enable reCAPTCHA For Registration Form?
Enable a reCAPTCHA on the registration form to prevent bots registering an account.
ReCAPTCHA Keys
Enter your private and public reCAPTCHA keys here to use the service. You can sign up for your own set of keys at reCaptcha.net, or you can use the default ones as they will work on any domain.
Image Format For Automatically Generated Thumbnails
Choose from png, gif and jpeg. Ensure that you have the correct modules installed to generate the correct format. The gif format is only available if you have GD library version 1 installed.
Click “Update Configuration” to save your changes.